March 19, 2008

SNOWED IN


I have been to work the last two days and each evening I come back to find the house transformed!! The Warmcel guys are now Officially Finished and the house is warm and cosy. Putting all this insulation in the internal walls has made a difference to the whole feeling of the house - it was never very echoey but now it feels more solid and soft.

The stuff being grey, it also looks like grey snow going in and a whole load of concrete blocks once installed. This is the other way of installing Warmcel - instead of being pumped inside the wall, we sheath one side of the stud wall and then the insulation is sprayed against it from the open side.


The first stage: the recycled newspaper is pumped in, and at the same a fine mist of water helps to set the Warmcel into the wall.


This is the second stage - the Warmcel is rolled flat
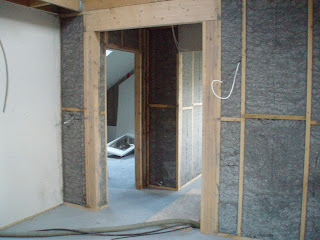


From the landing across the top of the stairs.


Kate's sunny room


The living room ceiling with added timber beam detail. The timber beam here is becasue we didn't want a steel beam, even though that would have been hidden in the ceiling. To get the strength using timber we had a deeper beam which shows - but we think it's a design feature! You can also see the underneath of the top of the stairs, which will be covered.


This is a video of the Warmcel bloke spraying sideways (just turn your head!)

March 15, 2008

Rooms taking shape........

The piano room, aka Louise's room


Emily's room - wardrobe corner back right


Looking out of the bathroom


R, imitating those guys who sit on high girders in New York, fixing the board around the stairwell


Emily's brilliant idea - to have a big space to light the staircase naturally. This is the wall between the staircase and the hall.

March 12, 2008

The inside is taking shape....

.... with every bit of plasterboard. We have hired a nifty piece of kit to help R - cheaper and less likely to hammer nails in the wrong place than a labourer.


Here it is - you put the board onto it and wind it up to the ceiling, then start on the lower part and screw it it - voila. Himself is aiming for 16 boards a day and did 10 yesterday - not bad for the first day. Plus he has to put some bits at a slant on the sloping ceiling.

What else? we now have first fix electrics and plumbing done and most of the ventilation system, seen here
- lots of shiny pipes, very lightweight and easy to fix. I have a bit of a tic about ventilation and so I'll be monitoring indoor air quality.

Wednesday
The ceiling for one side of the first floor is now complete, together with a hole in the ceiling for loft access from Emily's room.

March 01, 2008


HAPPY MOTHERING SUNDAY TO THE BEST MUM IN THE WORLD


These are photos of the view from all sides of the house, for my mum


First floor, south window looking left


First floor, north window


First floor, north window looking left


First floor, north window looking right


Ground floor, front door (east) looking right


Ground floor, front door (east) looking left


Ground floor, north window looking left


Ground floor, west window looking left


Ground floor, south window


Ground floor, south window looking left


Ground floor, south window looking right